
Want a wakeboard sponsorship? Here's what you need to know.
Every month, wakeboard sponsorship requests hit our inbox by the dozens. With social media playing such an expansive role in wakeboarding these days, we wanted to share 5 keys to help you make the most of your hunt for wakeboard sponsorship.
1. You don't need an extensive list of tricks. Work on making tricks look good.
It could be as simple as grabbing a trick in a difficult way, maybe even focusing on only a handful of tricks that stand out to make it your own style. Like Shredtown, find new ways to evolve your riding style. Spend a good amount of time thinking about subtle differences in riding styles that can make you stand out amongst your peers. You can do that by studying past rider's video parts. In short, focus on quality and not quantity. Study other great riders and tricks you find stylish. Work on tricks that offer the unexpected before crossing off the next trick on your list like a gym training session.
2. Social Media exposure is a must sponsorship, consistency is just as important.
With today's posts become stale in a matter of hours and new technology continually evolving, it's important to build engagement and trust on those platforms with a consistent schedule. What's that mean? Focus on shorter 'off the cuff' edits and run live streams to connect with your audience in a more impactful and organic way. Shorter form content doesn't necessarily have to highlight wakeboarding. Shake it up a bit and showcase the reality of traveling & the work you put in, the gear you use, or even your day to day downtime activities. There's a time and place for higher budget, longer form content. Focus on one thing at a time and increase your engagement. Then build trust around longer term, higher budget projects. 100 engaged followers is better than 10,000 unengaged bot likes.
3. Know your value. Exposure isn't everything in wakeboard sponsorship.
This is a big one. Up until a few years ago brands had little data to rely on in order to gauge the value of a wakeboarder. Was winning contests, producing video parts, or photos in magazines the key to a successful sponsorship? Was this even the correct way to gauge a rider's value? Probably not. Nowadays, with magazines transitioning to the online space and athletes having just as much power as magazines to showcase their riding, the power dynamic has shifted. Certain web analytics can help guide you to a more desirable outcome for both you & your sponsor. Let me give you one example.
Let's say a sponsored rider is endorsing a signature product on a company's website. Using a few snippets of tracking code, the brand and sponsored rider can review the volume of traffic this page receives compared to other pages. They could also see where the traffic is flowing from. They could track site visitors and see if an online purchase was referred by a sponsored rider's network. So, having clearly defined goals using analytics helps with the outcome for both the rider and the sponsoring brand. This is why brand collaborations with well known athletes with engaged following is such a positive outcome. Also note, success doesn't necessarily be about making sales either. There are a variety of ways to work together outside of sales. So, having a clearly defined goal allows both the rider and the brand to stay in clear communication about expectations and how to best achieve that.
4. Contribute in ways other than wakeboarding
Yes, wakeboarding & wakesurfing is one of the best creative outlets. That's what makes it so fun. However, don't expect to retire off of a wakeboarding career (or even make an above average career financially speaking). Wakeboarding can offer visits to unexpected & exotic locations, introduce you to new peeps, and give you new skills. Chicks dig skills.
Getting to experience adventure at a younger age sets you up for success in the future. The most successful pro riders of the past transitioned their career this way. Wakeboarding became the launch point to explore new creative paths, launch your own brand, or give you a dream job down the road. Thankfully, we're seeing this more regularly now. Pro riders can control the creative direction and highlight their perspective and love for riding sideways in their social channels and gain instant notoriety. Pro riders becoming accomplished photographers, videographers, even brands in their own right. Creativity outside of wakeboarding is just as important as creativity in your riding.
5. Produce your own content and partner with brands outside of wakeboarding.
Publishers need stylish pro riders in order to showcase how fun wakeboarding, wakeskating and wakesurfing is. Spreading good vibes. Selling more of what the brands are pushing (yea capitalism). This is an essential part of any industry. In order for publishers to support riders and accomplish this, they often need the financial support from larger sponsoring brands with cool, stylish riders. These brands ultimately provide the money to back the marketing projects of the publisher's choice. Riders are essential parts in this process. With the right technology in place, it's easier than ever to produce insightful and valuable content, build your audience, and eventually produce a financial return for yourself and the sponsoring brands. Remember, when you've built a sizable, engaged audience the rider holds the power for content production. So as I listed above, focus on cool, stylish tricks while establishing transparency and trust with your crew. With all the resources available today, there is no clear distinction between producer/publisher and sponsored rider when it comes to content production.
So how do you find the right brand to make a living in wakeboarding? One possible angle is to look for sponsoring brands outside of wakeboarding that have a product that might be complimentary to wakeboarding or the larger water sports market. Think about how can you partner to promote each other in an organic way. A great example of this is Mitch Bergsma. Mitch has hundreds of thousands of followers and lives a crazy fun life cause he was willing to venture outside of wakeboarding, but still make wakeboarding a key part of his content plan. If you're wondering how you can get started some of what I've outlined above, create a profile on our website or engage with us on the interwebs.
Produce content, build an audience and keep moving out there.


Using Creative Brand Collabs To Grow Your Business [Finding Inspiration In Street Art]
Social channels for discovering new brand partnerships, street art and design.
In a world of instant connectivity, finding the inspiration to create your next great product or brand has never been easier. We use Pinterest, Instagram, Dribbble, Behance, Artsy, and Ello as powerful social channels to inspire our designs. We browse and curate street art and contemporary art through these emerging graphic design focused social apps.
Before all these great online resources existed however, it wasn’t as easy connecting to the web. Designers and product managers would visit other related industry trade shows. If you’re just getting started with your first brand, building a new product, or sourcing new customers, we recommend this route. In fact, we still adhere to the same principals of attending trade shows early on in a new project’s development. In fact, Steve Jobs got the inspiration to create the first Mac and start Apple through a trade show [start with SIA & Outdoor Retailer, for the outdoor industries].
If you’re eager to innovate, sometimes a better place to uncover a new direction is to actually study a completely unrelated industry.
The Graphic design ‘hierarchy’ in board sports
Being curious about the creative aspect of building and designing, we always found our search for creative emerging trends for board graphics tended to trickle down from the skateboard industry.
Being that skateboarding is based in the streets, a skateboarder would befriend a street artist. Eventually, the street artist’s work would make its way to board graphics [if a skateboard company listened to it’s customer base ie. other skateboarders].
After years of observation, we found the design chain hierarchy within ‘action sports’ went something like this:
skateboarding > surfing / snowboarding (BMX) > wakeboarding (moto, snow skiing, etc)
How did skateboarding lead creative partnerships? The combination of skateboarders & artists [street art, music and film]
So how did skateboarding lead the way within the hierarchy of design for board graphics? The most obvious answer is skateboarding was very accessible and had more time to mature than the other activities except for surf. That brought in more participants and a larger, more diverse following.
Naturally too, skateboarding had a connection to the streets. Immediately it was more accessible to a wide range of creative personalities. The cheaper manufacturing cost and more readily available materials allowed for experimentation in production and design. This led to a higher rate at which they could produce new designs and experiment.
The crossover appeal of street art
As skateboarding took off in the 1990s you saw a crossover of gifted street artists & designers also skating. Skateboarders were hanging in social circles with artists of all backgrounds. Skaters were becoming artists. Artists were becoming skaters. NYC & LA was ground zero for this, with skateboarder Jason Lee becoming a prime example of that. Skateboarders were connecting with film makers, contemporary fine artists, street artists, musicians, fashion designers, photographers, you name it.
Recommended Watching: Dogtown & Z-boys, Riding Giants, Abstract: The Art of Design
Skateboarder and illustrator Todd Francis may have summed up working in skateboarding best, “For some folks, it’s a chance to finally work in an industry they’ve followed their whole lives. It’s a chance to create artwork with very few rules or restrictions.”
Then the internet hit.
The explosion of social networks dismantled the design hierarchy above. As the concept of sharing design on the web became ubiquitous, it also increased the speed at which new designs were shared and ‘picked up’ in other industries. While the web certainly made it easier to discover new design trends, it also made it more difficult to uncover and create an entirely new direction.
Recommended Skateboard Books


“Good artists copy. Great artists steal.” [incorrectly attributed to Picasso via Steve Jobs]
Find something you like, then make it your own.
So where do we draw our inspiration for our wakeboard graphics? In short, a mishmash of outdoor inspiration, movies, music, street art and fashion (streetwear). We like to provoke a secondary meaning with dichotomy of nature and technology. When you start combining what inspires you, you’ll start to notice a new perspective or interesting direction.
The influence of the internet. The power of combining sport, music, film, fashion, sculpture, and photography.
Over the past 30+ years street artists have gone from art world outcasts to getting coverage in mainstream media.
Their success hinges in large part from street artists & brands finding a common connection in overlapping interests or shared social causes and then elevating each other’s message.
On rare occasion, when done successfully collabs open up new audiences for both the brand and the artist.
Take popular street artist Shepard Fairey as an example. While still quite well known in street circles at the time, Shepard created the iconic ‘Hope’ poster. He eventually won the official approval of the Obama campaign during his run for the white house.

Fairey built a small following with his work initially, leveraged a new audience to share his designs & message (however good or bad the press that followed), and the success of his brand Obey Giant soon followed. Balancing the fine line of artist and corporate work is not easy.
The irony of street art and streetwear.
Well known streetwear brand Supreme has developed a cult-like following from launching limited edition artist collabs and partnerships. They’ve been doing it for a long time. Supreme’s new products drop weekly and sell out immediately.
The limited edition street art pieces has even created their own secondary resale markets. Supreme opened the doors to many of the brand x artist collabs now common throughout industries outside of streetwear.
Here’s a look at some of Supreme’s most successful collaborations over the years with artists.
Insights for making a connection: know your audience [brands and artists]
As an artist, designing a product for a product collaboration without a traditional canvas can be tricky.
Sometimes the product a designer must work with is limited by material, awkward forms and shapes, or even color. Now add to this long hours, heavy competition and low pay and you see why the designer must have a strong connection with the underlying industry he or she is designing for. Fear not, if implemented correctly it can also lead new brand partnerships.
Our recommendation for new artists is to start small by building a portfolio of work for friends. This usually leads to recommendations to other brands. If you’re successful in finding work with another brand, don’t approach a competing brand in the same industry for more work in a short time frame. We find this happens often.
As a brand, we think it’s important to forge a connection and spend time with the artist and find out why the artist style fits with your audience or brand. So in short, have a clear direction of what you’re looking for.
The main point to remember for both artist and brand for commercial collaboration is to keep the outcome in the interests of the audience. In short, the golden rule is know thy audience.
The street art veterans of brand collaborations.
5. Adam Haynes
Adam Haynes was Nike’s go to man for much of their media campaigns and branding. His illustrations are a dreamland of shred-able terrain.
4. Todd Francis
Todd has been creating graphics for skateboards since 1993 among the other “crud” he does. He’s worked with Anti Hero skateboards, Stereo Skateboards, and Real skateboards before being Element’s main man starting in 1999. Todd has a very diverse style and adds humor in his designs, which we appreciate.
3. Christian Hundermark
Runs C100 Purple Haze studio with Clemens Baldermann out of Munich, Germany. They work with an impressive list of clients large and small. Conception, art direction, typography, design and illustration – you name it – they do it. Crisp, clean, thought provoking style. They have a street art book called “The Art of Rebellion“. They’ve got some great notoriety through Rome Snowboards.
2. 123klan
We are long time fans of 123klan. They are a French duo that has a long history of awesome work with apparel brands and street art scene.
1. Steve Cousins
Steve is one of the key members of Jager Di Paola Kemp Design where he has helped Burton Snowboards build every aspect of their image since 1989. This is the man behind the global powerhouse – enough said.
Introducing The Humanoid Creator Collective
The Humanoid Creator Collective produces limited graphic runs showcasing standout artwork from artists in their field. The very first artist is OG sci-fi / fantasy illustrator and painter Frank Frazetta.

From the covers of Edgar Rice Burroughs’ fantastical novels to the harrowing tales of Conan the Barbarian, Frank Frazetta captured the mystery, adventure, and thrill of the sci-fi/fantasy world with his artwork. Redefining the genre of sword and sorcery, Frazetta painted images that not only brought life to recognizable characters of brazen stories but created a vivid world for us to view them in. Whether battling monsters on far away planets, standing atop a pile of skulls, or rescuing the scantily clad girl of his dreams, Frazetta’s characters tapped into our deepest fantasies.
We wanted to be them. Those dudes with the swords, the babes, and the beasts. Savage, sexy, and downright badass. A sled pulled by polar bears. Slicing an anaconda in half before it devours your face. Rescuing all those supernatural women devoid of any clothing. Frank’s paintings drop us right into the action. This was the fuel that pushed our adrenaline to the max. It was metal before there was metal.
We’re producing a limited run of boards under the Creator Collective with guest artist Frank Frazetta. In a tribute to one of the great artist icons of the 1970’s, we’re unleashing this beast just as Frank would have. Not only paying homage to a great artist but also to a great sense of adventure, fantasy, and tearing the new world a new one.
From the covers of Edgar Rice Burroughs’ fantastical novels to the harrowing tales of Conan the Barbarian, Frank Frazetta captured the mystery, adventure, and thrill of the sci-fi/fantasy world with his artwork. Redefining the genre of sword and sorcery, Frazetta painted images that not only brought life to recognizable characters of brazen stories but created a vivid world for us to view them in. Whether battling monsters on far away planets, standing atop a pile of skulls, or rescuing the scantily clad girl of his dreams, Frazetta’s characters tapped into our deepest fantasies.
We wanted to be them. Those dudes with the swords, the babes, and the beasts. Savage, sexy, and downright badass. A sled pulled by polar bears. Slicing an anaconda in half before it devours your face. Rescuing all those supernatural women devoid of any clothing. Frank’s paintings drop us right into the action. This was the fuel that pushed our adrenaline to max. It was metal before there was metal.
We’re producing a limited run of boards under the Creator Collective with guest artist Frank Frazetta. In a tribute to one of the great artist icons of the 1970’s, we’re unleashing this beast just as Frank would have. Not only paying homage to a great artist but also to a great sense of adventure, fantasy, and tearing the new world a new one.

Interested in working with us? Drop us a line. We’re always on the hunt for new brand partnerships and collaborations.
Wakeboarding Height & Weight Factor: Choosing The Best Wakeboard Size
 A good way to fine tune your wakeboarding skills is to choose the best wakeboard size that is ideal for your body type. The wakeboarding market is abound with all kinds of boards that vary by shape, length and width. We've received questions about finding the ideal wakeboard size and today we are going into detail about how to do so. There are a couple of key elements when choosing the best wakeboard size: the height and weight factor.
The Weight Factor in Choosing the Best Wakeboard Size
The most common reference in finding the right wakeboard is the manufacturers’ specifications guide. These are often posted on the manufacturer's website or printed on the product labels. Most manufacturers rely on weight alone. Using weight as the sole reference would be fine if every human being were made identical. Within a standard recommended weight to board size guide you can have a large variance in heights and this height factor must also be taken into consideration when selecting the best wakeboard size.
Height Factor in Choosing the Best Wakeboard Size

Height is just as critical to board size as weight is! Many deny this citing that weight is most important in order stay afloat. Exactly! This is the exact reason height as just an important of a factor as weight. You also need balance right!? And what is the effect of height on balance?
Take, for instance, your recommended wakeboard size is X based on your weight Y. However, if you are unusually tall for your weight, then selecting a longer board set with wider binding inserts allows your stance to sit wider according to your height. This will give you much more horizontal stability when riding and give you more balance.
Wakeboard Length
Wakeboard length can be skewed shorter or longer according to your body type and skill level. If you are shorter than average in regards to your recommended weight, your weight should take precedence. You should go with the recommended wakeboard size that is specified on the size chart in order to give you more surface area and float. This is not always the case for all riders but it does make some aspects of riding more forgiving [easier].

Common Height & Weight Rule
Different sizing guidelines apply to different wakeboard shapes. A good rule of thumb is, if multiple riders are going to be using the same board, base your selection on the weight & height of the heaviest rider. Larger boards are also wider which also provides more lift and softer landings. Beginners will have an easier time getting up, while advanced riders will enjoy increased rocker heights.
Wakeboard Weights
 Wakeboard manufacturers like us are constantly experimenting with different materials and processes to make them lighter and more durable. Upgrading to a lighter board is like replacing a trusty Toyota with a sleek and powerful Porche. You might want the latter but it might with increased risk and a higher price tag.
As you decrease a board's size it may feel lighter, spin faster, and seem more aggressive. However, landing becomes more difficult with the reduction in length and weight. This is due to the decreased surface area. Smaller wakeboards are a solid choice for pro riders who can handle high speed spins and need to add an extra 180 to land their next trick. But in general you can't going wrong with sizing up a bit.
Next Steps!
Want to take your board selection to the next level? Why not build your ideal custom wakeboard personalized to your preferences? Customize yours now!
Refer to our Ultimate Wakeboard Enhancer below for a wakeboard size that will suit you best. Remember to consider the above information when deciding a larger or smaller size than recommended. Remember, using your weight AND height to determine the best wakeboard size.
Check out our shop and see what works best with your riding style — or customize one of your own! Need more help deciding? Learn more about how to buy a wakeboard, why we like Flex wakeboards, why we use M6 Binding Inserts, or even how to edge better. Happy shopping!
Armed with this extensive understanding about how to pick the right wakeboard. We're confident that you'll find (or create) exactly what you're looking for with us. We're committed to helping you achieve your on-the-water goals.
Have some more questions about wakeboard sizes? Ask us in the comments below.
Update: We released a new app that calculates your ideal board size using your height & weight. We recommend sizing up! Check it out below!
Benefits Of M6 Wakeboard Binding Inserts: Making Bindings Secure

Are you using M6 Wakeboard Binding Inserts and bolts to keep your bindings secure? The wakeboard industry has gone through a lot of changes in its development of boards and wakeboard bindings. The results have been more secure wakeboard boot / binding inserts.
The wakeboard industry has been working towards common standards which decrease the cost of manufacturing while allowing products to be interchangeable across brands. This helps wakeboarding grow. More specifically, we'll explain the decision to move to M6 wakeboard binding inserts. The outcome is less hassle for you, the buyer.
Much like the wakeboard industry, the snowboard industry has gone through similar changes with insert and binding patterns. The skateboard industry has gone through it with skateboard trucks. The surf industry has gone through it with fins.
What existed before the invention of wakeboard binding insert threads?
In the early days of wakeboarding, we saw wide 8 inch wide binding plates [called a chassis]. As wakeboard bindings evolved and materials, innovations, and assemblies were modified, they moved to 7 inch plates. Then again more recently, wakeboarding moved to 6 inch plates. This drastically reduced the amount of chassis material for the boot. This lightened up the weight of your binding.
In as similar vein, we've also seen many companies evolve with fin screws and fin hole spacing. They've gone from one single fin hole. Then they moved to two fin holes spaced 1.5 inches apart. Finally settling on a 3 inch hole standard with 1.5 inches spacing between each fin hole. This makes swapping fins across boards or finding replacement fins much easier. 3 inch hole standard for fin inserts are what we use at Humanoid Wakeboards.
Early growth of wakeboard binding insert threads
The most recent change has been in regards to wakeboard binding insert threads. Since I can remember, wakeboard binding insert threads have been quarter-twenty (1/4-20) threads, which are a UTS (Unified Thread Standard) measurement popular in the US and Canada. It's probable that this thread standard was chosen for wakeboards since wakeboarding originated in the US. Over the years, wakeboarding has grown to be a more global board sport along with surf, skate and snowboarding. The ISO (International Organization for Standardization) metric thread popularity and availability has influenced manufacturers to change from Standard threads to Metric threads. Let me explain why this decision is a better suited option for wakeboards.
Metric and Standard wakeboard binding insert threads

The first major reason for the binding insert update is availability. The snowboard industry is much bigger than the wakeboard industry. Snowboard manufacturers use the same board inserts on snowboards. Snowboarding moved to a metric standard years ago for the same reasons wakeboarding is doing it now. Since snow brands are a larger market, they have more manufacturers producing inserts for snowboards worldwide. This makes metric inserts more readily available and cheaper for manufacturers to purchase in the wakeboard industry. This is a major reason to switch. More availability and cross compatibility. Now onto the performance benefits.
The Performance Comparison between M6 Wakeboard Binding Insert Thread and 1/4-20 Standard Thread

Now lets talk about the performance difference between M6 Metric and 1/4-20 standard threads and why the decision to switch benefits you. We are only going to compare these two wakeboard binding insert threads since they are the main ones used in the market today. Insert depths from manufacturer to manufacturer do vary, but on average inserts are at least 10mm deep. So this gives you at least 10mm of thread engagement if your binding bolts penetrate at least 10mm into your wakeboard. Here's where you start to see the real difference.
On a 1 inch 1/4-20 binding bolt with standard threads, the first 10mm of the bolt only yields 9 full threads. A one inch M6 bolt with metric threads yields 12 full threads. Yes, a small difference but these 3 thread guarantee you a more secure fit. This is a 'perfect world' example.So I decided to consult one of our engineer friends Kevin Kimball. Here's what he had to say...

From the engineer
Thread Failure
"I did a few quick calcs to see what the differences are for the 1/4-20 and M6 bolt thread engagement. Let me start by saying a couple things. First, threads fail progressively meaning they don't all fail at once. When a screw fails the first thread fails first, then the next , then so on and so forth up the shaft of the screw. It just happens so quickly that it seems like they all fail at once. With that in mind, you also have to plan for the first thread or so of the screw and the first thread of the insert having flaws as part of the machining process, so we'll need extra threads to compensate for these first weaker threads.
Minimum Thread Engagement
The typical desired minimum thread engagement depth for any screw size is usually 1.5 times the diameter of the screw. So this means a M6 metric screw with a diameter of 6mm has a minimum thread depth requirement of 9mm (6mm x 1.5). A 1/4-20 standard screw has a diameter of 6.35mm, so it has a minimum thread depth requirement of 9.525 (6.35 x 1.5). So both screw types have a similar required depth but 1/4-20 standard screw has less threads in this distance because standard threads are more course. This may be a reason so many riders are have problems with the screws getting loose. There are not enough threads on a 1/4-20 screw working to hold the screw in place.
Thread Pitch
As thread pitch moves from course to fine, the slope in the fit goes down. When making a courser 1/4-20 threaded hole, the actual % thread is about 55%-60%. That means the hole drilled in the insert is sized so that the tap only uses the outer 55-60% of the tap teeth to cut threads. Threads are not full depth and therefore, are more loose. This is done because it is difficult to make 100% threads with course pitches.
As you move to a more fine thread pitch like the M6, the % thread is more like 75% so 3/4 of each thread face is in contact between the screw and the insert. The fit of the M6 has less slope and tends to better stay in the tight condition as compared to a course thread. A fine pitch thread tends to stay in place better than a course thread since the % of change per rev is less for the fine thread.
What does this mean for M6 vs. 1/4-20 screws?
Simple. The choice of M6 bolts for the boards will provide a more secure fit of the bolts to the inserts. This will improve the bolt retention and be better for keeping the binding hardware locked down. This improved fit comes from having more threads engaged between the bolts and inserts as well as the better machining of the insert threads associated with the M6 size compared to the 1/4-20 screw."
-- Kevin Kimball
Engineer
The angle of threads in binding screws
 To go along with everything mentioned above, the angle of the threads, referred to as lead, are steeper on the 1/4-20 standard screw than that of the M6 metric screw because the M6 has more threads packed into the same distance. Since M6 has a shallower [less steep] angle, it has less chance of wanting to slide along that angle and loosen. If you thought of the threads as a slide, which threads would you be able to slide down easiest, up or down? The answer is the 1/4-20 standard screw, which means they have a greater tendency to loosen when compared to the M6.
Safety First. Tighten those bolts!
Now that you understand why metric threads are better from an engineering stand point, let's talk about how to properly tighten screws when assembling your board. First, the most important thing to remember is that you should always check your binding screws before every ride, no questions asked. Every ride. They always have the potential to loosen regardless of the type, M6 or 1/4-20.
If you ride with loose screws your bindings can skip teeth, which can twist your knee, ankle or leg in general when you land. This quick change of your stance angles can cause injuries. It's smart to keep screw drivers in your boat or vehicle if you travel to the cable park. Most cable parks have tool tables or tools available there, but don't count on that. Also, most of these tools available at the park are usually pretty beat up from regular use, so you are better off bringing your own screw driver. Make sure it's the proper type of screw driver. What's the proper type you ask?
Get the right tool for the job. Use the right screw driver for M6 binding inserts.
Most people have seen different size screw drivers, but don't really pay attention to the actual sizing needed for the screw they are using. They just grab the nearest screwdriver and crank away. What they don't realize is that each size screw head has an ideal corresponding screw driver size requirement to achieve proper grip. It also stands to decrease wear on the screw head while tightening. More simply put, the proper screw driver will allow you to get your wakeboard binding screws tighter and the screw heads will last longer. Most manufacturers like us supply you with "Phillips" head screws, so the screw drivers we will be talking about are Phillips screw driver.
| Tool Size (#) | Fastener Size |
|---|---|
| #0 | 0-1 |
| #1 | 2-4 |
| #2 | 5-9 |
| #3 | 10-16 |
| #4 | 18-24 |
See the chart to the right. Our M6 binding inserts screws size sits in the 10-16 range on the chart. This requires a #3 size screw driver, which is pretty large. If you use a smaller size screw driver on our M6 screws or even on 1/4-20 wakeboard bindings screws you can quickly wear down the head.
Using the wrong tool increases wear [and don't use a drill]
Check out the image below to view three M6 heads of the same size, the first tightened with a screw driver that was two sizes too small (#1), the second tightened with a screw driver that was one size too small (#2) and the third tightened with the proper #3 size Phillips head screw driver.
You can really see the difference in wear on the heads. More importantly, you feel the difference in how much tighter you can tighten the screw using the proper #3 size screw driver. I was able to to get almost another full 360 degree turn out of the proper combination and this means that my bindings are tighter to the board resulting in a safer assembly. And remember, drills have a tendency to cause even more damage to the screw threads along with the top shown below. A drill will also heat up from friction that causes irreplaceable permanent damage to the board insert & screw head.

The performance benefits of the right tool. More response!
So how does this all translate to your wakeboarding performance benefits? Heel lift in your bindings causes a slower board response. Heel lift is when the wakeboard binding chassis bends when making a turn. The less heel lift, the more response you get from your wakeboard & wakeboard boots.
Decreasing heel lift poses a challenge for most manufacturers since we are limited to only one central row of inserts on the board. So it's important to max out the performance and strength of M6 inserts, screws and wakeboard bindings. Next time you grab your wakeboard to take a set, make sure you grab the proper #3 screw driver. Crank your screws down tight for a better response while keeping yourself safe.
Now you know! Having trouble knowing how to choose your M6 equipped wakeboard? Check out our shop and see what works best with your riding style — or customize one of your own! Need more help deciding? Learn more about how to buy a wakeboard, why we like Flex wakeboards, how to choose your size, or even how to edge better. Happy hunting!
How Flex Wakeboards Are Designed and Why They're Awesome
Let's get right to it. The question of whether to ride flex wakeboards, flexboards, or more accurately, wakeboards with flex, continues to be a heavily debated topic. First let me start by saying, every board has flex irrespective of the type of construction. The difference lies in the amount of flex. So yes, you should ride a flex wakeboard! Second, let us squash the "flex board" term and explain where that reference originated using a quick little history lesson about wakeboarding.
Origin of the name wakeboarding

Wakeboarding was once called "skurfing" by some and "ski-boarding" by others back in the late 70’s and early 80's during wakeboarding's start. Wakeboarding grew from ‘surf boarding’ behind boats with no foot straps or bindings when there were no waves in the ocean. The term skurfing originated in reference to combining water-skiing and surfing. Others organized the words differently by keeping the term "skiing" a fixture in the name. This is because water-skiing had been around much longer than wakeboarding as we've come to know it. Eventually the term was modified and gained popularity as "wakeboarding" - people were standing on a board after all - not on skis.
The birth of wakeboarding

Wakeboarding grew in popularity and gained legitimacy through major publications, governing committees, manufacturers, and athletes. The name change better suited 'board sports' already entrenched in pop culture. Terms like ‘surfboarding, skateboarding and snowboarding were already in use. In the early days of wakeboard manufacturing, the boards were constructed much like a surfboard, with a foam core, wood stringer, fiberglass and resin. The boards were then cured, sanded, and shaped to a surfboard like finish. The real difference in these boards, when compared to normal sized surfboards, was the smaller design and foot straps. Much like surfboards, this process yielded very little board flex.

Advancement of the manufacturing processes then led to invention of the first compression molded wakeboard. These wakeboards still had a foam core, fiberglass, and resin. They also had a top and bottom plastic material that enabled manufacturers to add colors by printing. Still, these early stage compression molded boards had very little flex. Actually, in those days, we would commonly hang boards up on the wall as artwork as soon as it lost it's stiffness.
The Invention of flex wakeboards
Compression molded boards quickly became the most popular way of manufacturing. Boards remained rigid and very stiff for decades. Eventually, a new method of wakeboard manufacturing evolved from snowboarding. We all know that snowboards have flex engineered in many different patterns. This crossover in manufacturing was probably a result of avid snowboard manufacturers tinkering with wakeboards in the summer and vice versa. Many manufacturers [Humanoid included] market snowboarding's original method of making a board "sandwich" construction. Sandwich construction is really a unique process of compression molding similar to traditional wakeboard compression molding.

When you compare the two builds, traditional vs. sandwich, the difference is in several factors.
The board press, the materials used in the press, board design, and how the board comes out of the mold (both in regards to aesthetics and flex) differ. This bring us to why wakeboards with flex gained the notoriety as "flex boards" or “flex wakeboards”. But, wakeboards don't necessarily have flex just because they were pressed a certain way.
The difference between traditional and sandwich construction
Traditional Wakeboard Manufacturing
Traditional compression molded boards come out stiff because of materials used, the overall design/contours of the board, and perimeter parting lines. On a traditional wakeboard, there usually isn't a sidewall material surrounding the perimeter of the board. The molds and core are designed in a way that presses the top and bottom material which encompasses the sides of the core giving the board a very thin parting [lamination] line around the entire perimeter of the wakeboard. The top material, bottom material and fiberglass wrap the board and join together at the sides creating a very rigid structure.
A good real world analogy would be trying to bend a flat piece of aluminum vs. a square aluminum tube. Assuming each piece is the same thickness, the square tube is much harder to bend because of the support that the two vertical sides give to the two opposite horizontal sides. This adds rigidness and very little flex.
The Updated Sandwich Construction Manufacturing

When laying up a board for sandwich construction, the design of the board is intended to have a sidewall and this sidewall often makes a huge difference. The sidewall eliminates the need for wrapping the entire core in fiberglass which is what you see on a traditional compression molded board. This eliminates much of the dead stiffness so the board comes out with what we call a “flex pattern”. Sidewalls will also help your board last longer by protecting the lamination or parting lines of your board.
The core of a flex wakeboard usually has a higher tolerance for flex. These cores are often different species of wood, like the 100% Paulownia wood cores in Humanoid Wakeboards. They flex and rebound very efficiently. Other cores used are foam or foam wood core combinations. Other wakeboard brands use this like Ronix Wakeboards, Hyperlite Wakeboards, and Liquid Force Wakeboards.
Designing flex wakeboards

We can control the outcome of the sandwich constructed board’s flex pattern by strategically locating the board's contours. We set the contours depending on where or how much we want the board to flex. The deeper the contour and the more vertical the angle of this contour the stiffer the board gets. We also control the flex pattern by controlling the core thickness. We do this by tapering of the board from middle out towards the end of the board.
Why flex is awesome
So this brings up the question, does the board have to flex? No! Do we want it to flex? Yes! Why? We can create a board with a much more lively and responsive feel by adding or subtracting flex in certain areas. This caters to a rider's preferred style of riding.

For riders who prefer boat riding, the middle of the board can be kept rigid so they feel response and pop off the wake. There are benefits to adding different variations of flex in certain parts of the board. It allows riders to load up the tail as they pop ollies or pop off the wake. They can also get a bit of torsional twisting as they carve hard through turns. For riders that prefer the park, we can also soften the nose and tail. This helps them achieve better presses and more control on rails. Additionally, we can alter the middle of the wakeboard to make it more stiff. This helps the board hold rocker on landings off of ramps at the cable park. This keeps the board from smacking flat against the water, scrubbing speed and making the board feel slower upon impact.
Growing popularity of flex wakeboards
From what I’ve seen recently, it seems like the sandwich construction process is maturing and growing in popularity among manufacturers. Traditional wakeboard manufacturers are modifying their hydraulic presses to accommodate this type of sandwich construction with sidewall board design.
Remember, the design of the board and the materials used are what dictates the outcome of the flex pattern. So, should you ride a wakeboard with flex? Again, the answer remains a resounding yes! All boards flex to some degree! It’s just up to you to decide on how much flex you want according to your riding style and needs.
Check out our shop and see what flex works best with your riding style — or customize one of your own! Need help deciding? Learn more about how to buy a wakeboard, why we use M6 Binding Inserts, how to choose your size, or even how to edge better. Enjoy!
-Kyle Schmidt
How To Determine The Best Stance To Prevent Common Wakeboard Injuries
But first, a bit of history about wakeboard stance widths...
Before we show you how to determine the best stance to prevent common wakeboard injuries we have to rewind it back a bit and establish how wakeboard stances have evolved. Or even more important, why they evolved. How a rider stands on a wakeboard, aka their riding “stance”, has progressed broadly since the early days of wakeboarding. In the 70s & 80s stances were narrow, directional (pointed 1 way) and mounted towards the tail of the wakeboard because of the influence waterskiing had on wakeboarding.
It wasn’t until the invention of twin tip wakeboards such as Waketech Flight 69 that stances became more centered, symmetrical and wider. This gave the rider more stability and control no matter which riding position they were in, regular or switch stance. This resulted in new styles & a new direction for wakeboarding.
As boat wakes grew in size, stance widths increased substantially with the notion that a wider stance would offer much more stability and control. It did also, however, place more stress on the rider as a trade off.
As the cable parks become even more popular, stance width has again come full circle and is trending back towards a narrower stance for a couple reasons. Some think the ‘hesh’ style of riding narrower looks better. The physical benefit is less joint and ligament stress on the rider because flat water landings are common and riders rarely rely on downward transitions at a cable park.
Over the years, the evolution of wakeboarding influenced our stances, our control and style out on the water. It’s knowledge you should understand so you can prevent injury & create a riding style of your own.
Your knee should have equal weight distributed so both sides of the knee joint share the load and impact of hard wakeboard landings.
— Kyle Schmidt
Common Wakeboard Injuries: Golden Rule #1 Protect Thy Knee Ligaments!
Before we dive into your ideal stance width and angle, let’s discuss your knees for a moment…
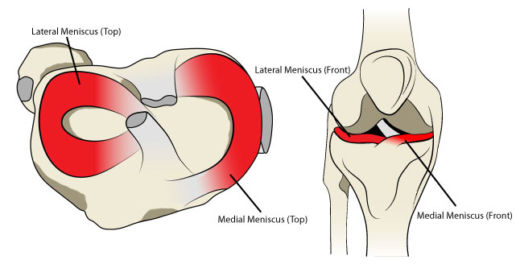
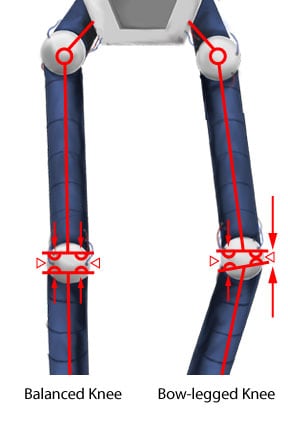
Inside the knees are two cartilage pads that help cushion the impact of running, jumping and, in our case, hard landings on a wakeboard. These two cartilage pads are called the medial and lateral meniscus.
The medial meniscus wraps around the inside of the knee joint and the lateral wraps around the outside of the knee joint. If an impact is balanced across these two pads they both work together to cushion the blow. If an impact is unbalanced, one side of the meniscus will take on more of the load than the other which increases the chance of damage to that side. This is far and away the most common wakeboard injury. So I’ll walk you through how best to prevent it
Golden Rule #1. Protect your knee by having a stance width that tracks balanced so both sides of the knee joint share the load and impact of landings. That’s it. There is no golden rule #2.
Ok, so now you know this, now we figure out how to find the perfect balance and stance to protect thy ligaments.
Your goal to prevent common wakeboard injuries is to find a knee position that moves with the least amount of stress on your legs, hips and back as you squat down.
— Kyle Schmidt
Determining Your Stance Width To Prevent Common Wakeboard Injuries
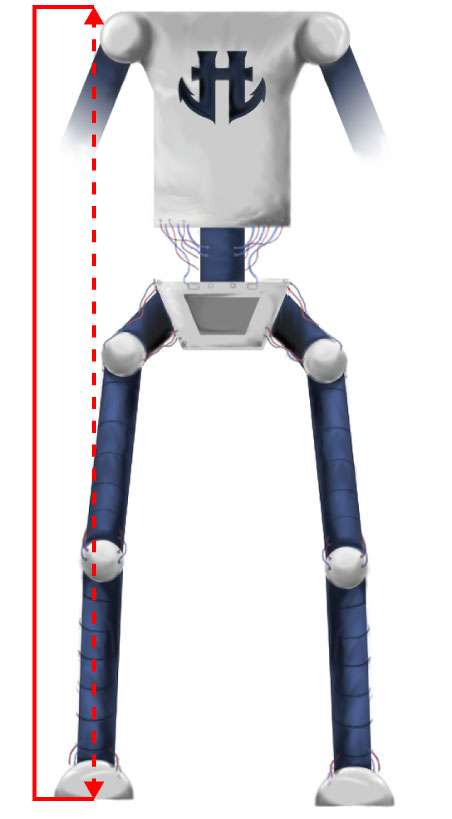
Your height is the number 1 deciding factor in how wide your stance should be. The other important factor is how your body is built. This has a bearing on how wide or narrow your stance width should be.
Your end goal for an ideal stance width is to find a position that moves with the least amount of stress on your legs, hips and back as you squat down. A good way to think about an ideal stance width for preventing common wakeboard injuries is to think about it in terms of board control vs. stability. I’ve created a stance chart that gives you a good starting point in inches and in centimeters.
Determine Your Stance Width Starting Point
Now, draw a line from the outside of your shoulder to the ground. We’ll call this your shoulder line. Half your foot should sit outside the shoulder line and half your foot should sit inside your shoulder line. This starting point will place your feet a little wider than shoulder width apart and put you in an athletic, balanced stance [see image]. This starting point also gives you stability side to side so you fall less over your board’s nose and tail.
After you find this starting point for width you have to consider your body type. Make sure that you’re positioned on your board so your knees track properly over your feet to help reduce the chance of injury to the knee ligaments and cartilage. Decide which body type you are, bowlegged, straight legged, or knock kneed so you can adjust your starting stance accordingly if necessary.
"If you need to see how this all translates to a wakeboard, watch pros ride behind a boat vs. at a cable park. See if you can spot the body type."
— Kyle Schmidt
Know Your Body Type
Okay, now we want to determine your body type so we can make slight adjustments to your wakeboard stance. This will really dial it in to prevent common wakeboard injuries. To determine your body type, stand on the ground with your feet touching close together. Then look at the space between your knees. Take note of the shape your legs make. Standing in front of a mirror may make it less awkward…or more, you decide. There are 3 shapes your body makes. They are shown in an exaggerated illustration below so you can understand visually how they look.
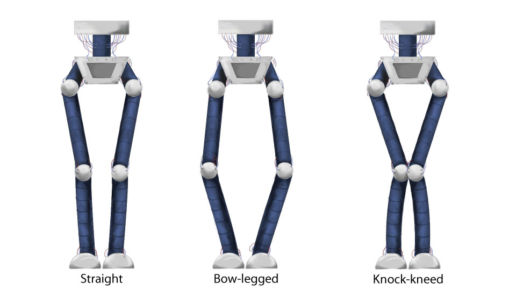
Bowlegged
Bowed legs will have a larger distance between knees. Legs from hip to foot will arch outward a bit in a bowed fashion. Knees tend to track outward to the sides of the body as the legs bend. This may require a slightly wider stance width to accommodate the outward tracking motion. This wider stance ensures equal pressure is applied to both the medial and lateral side meniscus during the hard impact that occurs during landings.
If a bowlegged stance is too narrow or two wide, it can cause the knee to track poorly and place unbalanced pressure on either side of the meniscus elevating a risk of injury. An unbalance impact will also strain the collateral ligaments running along the sides of the knee joint. That’s no bueno!
Straight legs
In the middle body type, there’s straight legs. With feet touching together there’s a slight space between the knees. Legs will appear straight from the hips down to the feet. For this type the starting stance from the chart below will put your legs in a position so your knees track straight over your feet. This will allow equal pressure on both sides of the knee joint.
Keep in mind you may have to adjust your stance in either direction because legs are not always perfectly proportional. You could also have less flexibility in one leg more than the other. The key here is to make sure that while you squat down in your balanced riding stance and bend your legs, both knees move in line with your foot, not inward or outward.
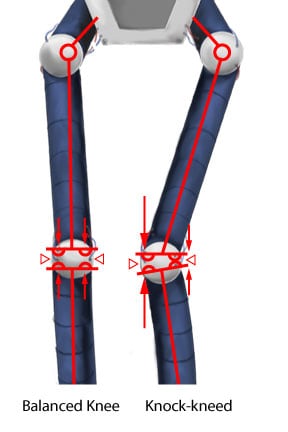
Knock Knees
Finally, we have knocked knees. With feet together, no space exists between the knees. Often, there’s pressure between the knees as they touch. The knees cross over each other and may sometimes knock together as they walk or run. Hence the name “knock” kneed. As dopey as it sounds, it’s usually more common than most people think. Knock kneed will typically need to adjust the starting stance narrower to accommodate the natural inward knee tracking.
If you need to see how this all translates on a wakeboard, watch pros that ride behind a boat vs. at a cable park. See if you can spot the body type.
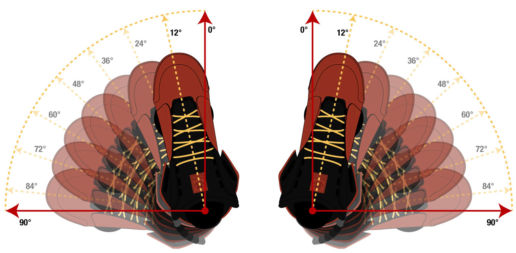
Through my years of experience as a professional rider and coach I have found that a solid starting stance angle is 12 degrees ‘ducked’ if riding with a stance width of slightly wider than shoulder width apart.
— Kyle Schmidt
Determining Your Stance Angle To Prevent Common Wakeboard Injuries
Now, let’s discuss setting your wakeboard boot stance angle. Most modern boots will have a stance adjustment & angle system attached to each side of the base plate in order to mount boots to a board. We developed a system we call Smart Toof Technology.
This angle adjustment allows the boot to rotate at a center point so you can adjust to specific stance angles. The angle is measured in degrees of rotation.
If you stand with your feet together so they are pointing straight forward, your feet are at zero degrees of rotation. This sets a baseline for the stance degrees. Since we ride wider than the a zero degree stance angle put us in, we must turn our feet outward slightly as our stance gets wider. This helps our knees track straight over our feet. This outward angle of the boots is referred to as a ‘ducked’ stance in wakeboarding.
Through my years of experience as a professional rider and coach I have found that a solid starting stance angle is 12 degrees ‘ducked’ if riding with a stance width of slightly wider than shoulder width apart.
Where do you wakeboard?
One final variable that might influence how wide you ride is your riding environment. The two riding environments are often classified as riding “behind the boat” or riding “at the cable”.
When riding behind the boat, riders often prefer a wider stance for a couple reasons. The first being a rider has more stability side to side over the nose and tail of the board. Why is this? Tricks happen directly behind the boat as the board’s position is traveling perpendicular to the boat’s driving direction.
A wider stance width also makes it easier on the rider because a boat wake has multi-directional energy. Meaning, the wake has variable, abrupt transitions compared to the longer, motionless ramps and transitions at the cable park. So again, riding with a slightly wider stance behind the boat vs. the cable park gives a rider more stability from the wake’s transitions. Remember, this wider stance is only a suggestion for boat riding when compared to cable riding.
So why ride narrower at the cable? From the standpoint of injury prevention, riding narrower aligns your legs closer with the rest of your body. This is ideal because riders land on flat water more often at a cable park. A better alignment with your body spreads the impact evenly across your knees as I mentioned previously. Riding a wider stance at a cable park can actually direct impact and uneven pressure in the knees, hip joints, and lower back causing more negative stress throughout the rest of the body.
"Having the correct stance for your body type is important to maintain correct alignment of your ankles, knees and hips. This leads to less injury and stronger riding!"
— Abby Delgoffe
Calculate Your Stance Width To Prevent Common Wakeboard Injuries
Now, I’m no doctor. Luckily, we have team rider who is, Abby Delgoffe. With her body mechanics knowledge as a professional chiropractor, we put our heads together to help you determine your ideal stance. Check out the app below! Remember, you may need to tweak your stance width and angles a few times until you find the most comfortable stance option after some testing.
With our latest wakeboards, we made a conscious effort to develop new half inch insert spacing. We found half inch insert spacing offers the perfect combination of having more stance options yet does not…overcompensate. You can find our 5 and 7 pack M6 inserts in use across our entire line for 2018.
Okay, congrats to you. If you read this far you now know the nitty gritty details of how stance widths are calculated. Still want more? We’ve developed an app to help you find your ideal stance with. Check it out below and share your stance width with a friend.
If I missed something please comment below. If you enjoyed the article please share it with a friend.
Sidecuts: 3 Wakeboard Designs & The Affect On Your Riding

Four 'Parts' Of A Wakeboard
The word board in ‘boardsports’ generally defines a rider as standing sideways on a board. Obviously a board is typically longer than it is wide. This lends itself to the board having 4 main ‘parts’. Those 4 parts are a nose, tail and two sides. These parts weren’t invented, it’s just how surfers naturally learned to float and balance best when they were riding logs into big waves centuries ago. The shape of one of the parts of the board, the sides, is referred to as a sidecut. In this article I want to talk about one of the most neglected aspect of wakeboard designs, the sidecut.
Here’s the thing- the sidecut of a board greatly factors into how a board rides. Actually, much more so than other design factors frequently marketed. First, let’s start with a simple analogy to help wrap your head around the definition of a wakeboard sidecut.
In terms of Wakeboard Designs, what are the Sidecuts?
Let’s imagine the perimeter shape of the board. It has a distinct shape and each board is cut out with the same perimeter shape. On the longer sides of this perimeter shape [the sides of the board], you have the sidecut shape of the board. Most wakeboarders don’t really pay much attention to the details of this sidecut shape. They visualize a shape more by the overall perimeter shape rather than the details of each section of the perimeter shape. But this is why it's important to pay attention to the details! It improves your understanding and leads to quicker progression.
Ok, moving a bit deeper, sidecut shapes can be broken down into three sections much like board rocker. Sometimes there are no ‘sections’ of the sidecut because it's designed with one smooth arc from nose to the tail. Think about this single sidecut arc like cutting a section of a large circle out and pasting it on the side of the board. No hard angles or sections exist within the sidecut sections. As I said, it’s just one smooth arc from nose corner to tail corner on that side. This would be like a single section sidecut.
The Single Section Sidecut

Randall Harris’ Circus Pro Series board is a great example of this type of single section sidecut in action on a boat specific wakeboard. The single side of the board has a radius that measures 125.42 inches (3.1856 meters). It’s one sidecut section of a circle that allows the board to roll through turns smoothly. This prevents any weird wobbles as the board transitions from riding flat to edging in towards the wake. This makes the board feel really fast.
I designed this arc shape from the center width of the board and taper to a slightly narrower nose and tail. This tail would then sit lower in the water and allow Randall to build really aggressive edges to fit his “go as big as possible on everything” style of riding.
The Multi-Section Sidecut

Next, let's discuss the multi-sectional sidecut shape. These sidecuts are typically designed by using a combination of different lengths of arcs (usually 3). A good example of multi-sectional sidecut at work is the sidecut shape on our Oracle Crossover wakeboard. On the Oracle, I used a combination of two arcs and a straight line to give this board a very distinct sidecut shape. This is for a very specific function when riding on the water.
Middle Section
The middle section of the sidecut is a straight line. When the rider is not turning [the board is riding flat on the base], the sidecut will make the board ride very stable. The board will also rely on less fin tracking to do so. This straighter middle section of the Oracle sidecut also helps the board lock into an edge when turning. The board wants to fall into this straighter section of the sidecut after initiating a turn. It feels a bit like a magnet holding your edge, instead of having to position it where you want it. This is very helpful for riders who struggle with the correct board position for toeside edging and approaches.
Nose and Tail Section
The nose and tail sections of the Oracle still give the board smooth turn initiation by tapering its arc. This arc shape is designed more abruptly toward the nose and tail rather than designing a flat arc. This will increase the board’s volume so that the pop off the wake is more abrupt. If the nose and tail arc was tapered more flat, the sidecut would be narrower. This decreases the volume of the nose and tail which decreases the pop. This would also make the board sit lower in the water. When the board sits lower, it will edge better through the wake for an edgier type of pop.
It’s amazing how you can subtly change just one small arc shape section of a board and completely change how the board edges and pops off the water.
The Bi-Section Sidecut

So, we’ve talked about multi-sectional sidecuts that use a combination of arcs and also single section sidecuts that use only one arc from nose to tail. But there is one more sidecut! It is called a bi-sectional sidecut, using only two arcs. We define it as bi-sectional because the two arcs join in the middle and are continuous to a tangent point in the middle of the board. The Mitch Langfield Pro Series park board is a good example of this type of bi-sectional sidecut.
On the Langfield Pro there are two sections because I’ve designed two arcs. The reason I use two arcs is to allow the control of the curvature of the arcs on the ends of the board. Controlling this dictates the volume and taper of the nose and tail sections which dramatically affects how the board rides.
If the arc is pulled towards the end of the board, the tail is more round so the board sits higher in the water. This translates into a more loose & playful feel on the water. That forces the rider to turn a bit more slowly.
If the arc is pushed more towards the center of the board, the tail is less round which makes the board sit lower in the water for a more aggressive turning board. In short, two arcs joined in the center, a bi-sectional sidecut, allow better control of the sidecut shape without the need to add an additional center section.

Find Your Ideal Sidecut
So there you have it! Three very distinct examples of sidecuts outlined for you along with why this affects how the board rides out on the water. Remember, all these sidecut designs are affected by the overall width of the board and the width of the nose and tail of the board. Now as you browse through our line of wakeboards you will notice the differences in these sidecuts. They can help you choose which is best suited for your style of riding.
If you still have questions and need our help directing you toward the setup that works best for you and your style of riding, check out our H+ subscription program and gain direct access to me or one of our H+ pros.
15 Of The Best Wakeboard Tools We Use On The Regular

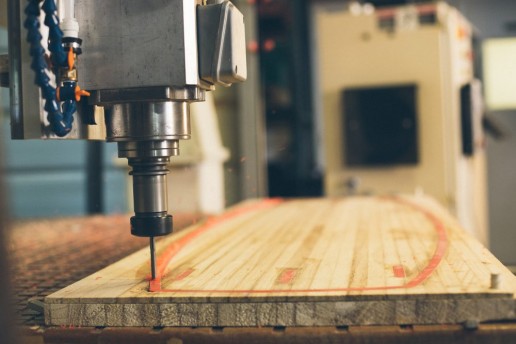
For the upcoming season we are going to be peeling back the curtains a bit more on our company operations. As such, this is going to be a completely new chapter for us but one we are truly excited about. Earlier this summer we shared a small preview of these plans when we released the video of how we build wakeboards. If you've signed up for our email list, expect new programs dropping as soon as next week! To kick things off, we are sharing 15 of the best technology tools & apps we use in wakeboarding.
Technology can be a fantastic tool for saving time. If used correctly, most of the tech resources can and will speed up your wakeboarding learning curve. In the process, you'll be adding more moves to your bag of tricks and hopefully having more fun on the water in the process. That said, if you're not focused and don't have a strategy, technology can also be a complete time suck. After spending our time, energy, and money over the past years finding that out the hard way, we've curated a short list of 17 technologies that we think are the best bang for your buck. Please note, this is only a small portion of the hardware, software, and apps we use. These tools & apps are the easiest to use and implement. After all, spending time in the great outdoors is what wakeboarding is about.
5 Hardware Technologies
Canon 5D Mark 3 - Chris O's got a keen eye for photography if you haven't noticed. This is what he uses. You'll want to take some online classes from Udemy on how to use this rig.
Wanna get started in wakeboarding photography? Here's a quick setup & buyers for DSLRs guide...
- Types of Camera Lenses that a Photographer should have - How to choose the best lens? Once you have determined in which type of photography you are interested, pay attention to the conditions and situations when you are going to use it. Then, look for the features which are essential for those conditions. And yes, pay close attention to the brand. The mentioned ones here are recommended.
Panasonic GH4 - Trevor Bashir's video camera of choice for all our video edits. Trick it out with a few gimbals from DJI and lenses from B&H
GoPro - Stack footy, edit, and share with friends.
DJI Drones - You might need a co-pilot to bring you through the first couple flights. If you are good at video games then you'll pick it up quickly.
Our Gear - Duh! Go step your game up.
6 Software Technologies
Evernote/Dropbox - Got some riding ideas? take notes, record audio & video, and make lists. Our virtual archive of thoughts and meeting notes.
Wordpress - Share your story online. lightweight, easy to use, and tons of great plugins. A library of great resources to help like WP Curve
Woocommerce - An e-commerce plugin for Wordpress. Have an audience? Set up a store, customize and sell.
Mailchimp - Organize email correspondence with your audience. This service has made great strides recently with its features.
Slack - Drastically cut down email correspondence. Like text messaging with some nifty features.
Adobe Creative Cloud - Pay Adobe a monthly fee and get access to all the creative apps for building things like websites & board graphics. A massive bundle for a small price.
4 Lifestyle Technologies
Bosu Ball - Channel you inner Mr. Miyagi. Good for injury recovery & [re]gaining balance.
Keto Diet - Load up on protein and natural fats, cut off carbs. Feel like a champ.
Gymnastic Bodies - An online fitness course for mobility, strength and flexibility training. Become a ninja.
Headspace - A digital health platform that uses guided meditation to keep the inner peace.
We've tested dozens of 'time saving' technologies to get to this point. So while this list is meant to be concise, it's no where near complete. Got some cool tech to share? Hit us up, we are easy to reach.
7 Key Wakeboard Positions For A Strong Heelside Edge
Here are the 7 key wakeboard positions you need to learn for a strong heelside edge.

The Setup:
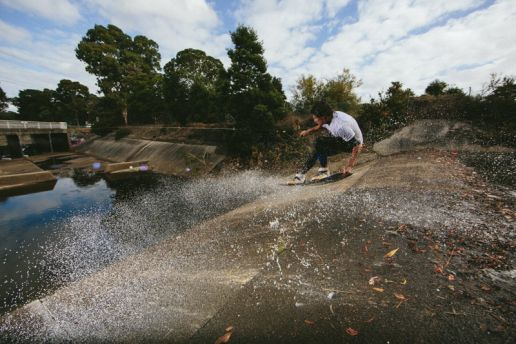
Wakeboard positions can get a little awkward at times. We get it. To set up for a toeside wake jump a wakeboarder has to edge out on their heelside edge away from the wake first. More often than not, this puts the focus on their toeside edge in and toeside air off the wake.
The problem with this is when a rider focuses only on their edge into the wake. Bad edging habits begin to develop with the initial edge out. If a rider edges outward heelside ten times (with the intention of a toeside air) with poor technique and bad position, this repetitive bad technique will start to be ingrained into muscle memory.
Then, when the rider goes to air the other side of the wake on the heelside approach, they are highly likely to use this bad technique. This will affect the position through the heelside wake jump and outcome of the air. Now, it's pretty obvious that when a rider edges away heelside from the wake ten times with good positioning it will also help them on the other side of the wake. This stands true for experienced riders, but is even more important for beginner wakeboarders. This will build a good foundation for riding both behind a boat and at your local cable park.
Bad body position wastes energy for edging back into the wake. Your edge out should be the time to conserve energy, relax, and focus for your air from your edge back in. With this in mind, we'll describe the proper position for edging starting at the top with the head and work our way down to the board itself. We'll be pointing out the 7 key things that you need to have in place for a strong heelside edge.
How to edge heelside out (away from the wake):
Head Position:
It's always best to look before you start moving. This is a natural human movement that should carry over to your riding from just walking around. Typically you look before you take your first step. This motion of looking actually makes your body lean before you take a step. On the water, if you look out away from the boat in the direction you want to go you will lean naturally and slightly in the proper direction with ease. It's the same natural tipping motion that happens on normal ground, all created by just looking. To compliment this "look lean" we'll talk about how the knees should react and compliment this in the sections below.
Shoulder Position:
Your shoulders should stay square to the boat tower the entire time you edge out. If your shoulders are not square to the tower, this will give you unequal weight distribution. We can also use the corners of the wakeboard handle. This is the part of the handle that the side rope extensions attach to the grip making a triangle. The wakeboard handle corners should also be square to your shoulders. It's also important to keep the handle level and not tilted or pushed in the direction you want to go. this happens frequently with beginners. It's like they are trying to steer with the handle - not good.
Arm Position:
As I previously mentioned in the "shoulders" section, the handle has two short side rope extensions that make up the triangle of the handle. Think of these short lengths of rope as an extension of you arms that extend the triangle of the handle to your chest. When you turn, the handle turns your hands, which twist your arms, which then tilt your shoulders. This is why it's important to keep your arms relaxed like an extension of the rope.
If you start to pull the handle with your arms or pull with one arm more than the other, you'll put yourself in a bad edging position. Your goal is to lean back, so your arms are helping to resist the pull forward from the line slightly to offset your leaning back. However, pulling with your arms too far forward reduces the power of your edge. Don't pull yourself towards the handle. It'll tire you out quickly, kill your edge speed, and put you in bad position for an edge.
Try to keep your arms relaxed but resist the pull forward. Then allow gravity to naturally let the handle hang low. It should feel like the pull is tugging from your waist or below - not your shoulders or chest.
Chest & Belly Position:
I refer to the belly in this section because this is a key component on starting your edge properly, second to your knees. Most riders drop their butt down towards the water, which causes a chain reaction of bad position. When you drop your butt down your hips go out back behind you. Then, your chest comes forward while your belly points down towards the water. This all equals bad leverage, bad habit and will lead to a bad faceplant. The correct movement should be to point your belly up towards the sky as you start your edge - move your hips forward, point your chest up, and your shoulders will fall back. Your knees make your belly point up (good) or down (bad). More on that in a second.
Hip Position:
Hip positioning is controlled by your knees and belly. Your goal in wakeboarding should be to keep your hips at least slightly in front of you towards the boat at all times in order to be in control when edging. Your hips should be level with the water and square to the boat tower or handle corners while edging out heelside. This is the same as your shoulders and how we mentioned they should be square to the handle corner. The more your hips are in front of you the closer they will be to the handle. Good hip position is very important so keep those hips in front of you.
Knee Position:
Okay, this is a key component of your heelside edge. When you are a few feet outside the wake starting your edge out you should start the leaning motion with your head first. Most wakeboarders think it's your shoulders that follow next...it should be your knees! Here's why. Your knee movement dictates the rest of your body movement. I like to use the "rolling your knees forward" terminology to describe how you should use your knees to start edging. If you say "bend your knees", most riders will just sit down - and this causes your hips and butt to drop down and back. This will create a bad edge position right away.
Gently roll your knees forward over your toes to start your edge. This causes your shoulders to fall back over your heels and your hips will move forward along with your knees. If your arms stay relaxed everything will fall in line and you will naturally fall back over your heelside edge in proper position with great leverage. This position will build good edge initiation and will generate a quicker edge speed. It will also use less energy and allow you to focus on your edge in. Remember, this is the key to starting your edges out, so roll those knees forward after looking where you want to go.
Board Position:
Most wakeboarders believe that they should point their wakeboard out to start edging out. They do this by using their feet to tilt or push the board in the direction they want to go. Using your feet actually contributes to a chain reaction of bad position. Trying to tilt or push your board around with your feet will cause your hips and butt to drop back and down. It will also cause your belly to point down and your shoulders to move forward. Everything you don't want.
My suggestion is to allow the board to do what it wants to do naturally by following the positions in the image above. Whatever you do with your upper body will translate down to the board and its edge. So, in summary don't think about the board. Start by looking which starts a slight lean and slight outward movement. At the same time you roll your knees forward over your toes, which causes your hips to move forward. This makes your belly point up and your shoulders to fall back over your heelside edge. You know have a strong powerful edge with much less effort.
Remember this: "don't move the board, move your body correctly and this will make the board edge properly."
To summarize the entire technique, start your edge out with good habits! Look outward where you want to edge out, and begin by rolling your knees forward. Then point your belly upward towards the sky and allow your level shoulders to fall back with relaxed arms and low hanging hands. Okay, now go give 'er a try!
Next Steps:
Is your board uncomfortable to edge on? Check out our shop and see what works best with your riding style — or customize one of your own! Need more help deciding? Learn more about how to buy a wakeboard, why we like Flex wakeboards, use M6 Binding Inserts, how to choose your size, or even how to edge better. Enjoy!
Have any further questions about the correct edging technique? Submit them in the comments below. Also if you found this article helpful, please share!
